| 1 | Nukitsuke | draw and initial cut |
| 2 | Kiri-oroshi | finishing cut |
| 3 | Chiburi | flinging blood off of blade |
| 4 | Noto | resheathing sword |
| 1 | ipponme | mae | front |
| 2 | nihonme | ushiro | rear |
| 3 | sanbonme | ukenagashi | deflection or warding off |
| 4 | yonhonme | tsuka ate | hilt strike |
| 5 | gohonme | kesa giri | diagonal cut |
| 6 | ropponme | morotetsuki | two-handed thrust |
| 7 | nanahonme | sanpogiri | three-directional cutting |
| 8 | happonme | ganmen ate | face strike |
| 9 | kyuhonme | soete tsuki | join-hands thrust |
| 10 | juhonme | shiho giri | four-directional cutting |
| 11 | ju ipponme | sou giri | all cuts |
| 12 | ju nihonme | nuki uchi | draw cut/strike |
If the kata are being called out in order prior to being performed, use the full numbering system, e.g., ipponme mae. If you are just talking about a particular kata, refer to it by name, e.g., mae.
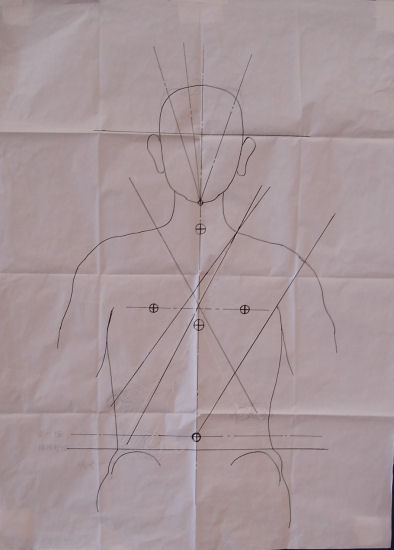
Kata Cutting Diagram:
Ueno Sensei brought this chart to the 2004 AUSKF National Iaido Camp for illustrating the angles involved in the ZNKR kata
Ipponme, Mae (front):
In the first kata, the swordsman is sitting in a formal kneeling/sitting posture called seiza. Sensing danger from an opposing individual seated in front of him, the swordsman reacts by administering a disabling horizontal strike to the head of his attacker; followed by a mortal overhead cut.
Nihonme, Ushiro (rear):
In the second kata, the swordsman is seated in the formal seiza position. He senses an attack from an opposing individual from behind. The swordsman reacts by simultaneously drawing his sword and rotating 180 degrees, to administer a disabling horizontal strike to the head of his attacker, which is followed by a mortal overhead cut.
Sanbonme, Ukenagashi (deflection):
In the third kata, the swordsman, while rising to his feet, executes a deflecting action with his sword, to ward off an attacking enemy's blade directed downward from overhead, thus having the enemy's blade slide harmlessly to one side. The swordsman quickly responds with an overhead cut, disposing of his attacker.
Yohanme, Tsuke Ate (striking with the end of the hilt):
In the fourth kata, the swordsman is seated in a posture which allows his right knee to be raised off the ground. This seated posture, called take-hiza, was common for swordsmen who wore full armor, to facilitate standing. The swordsman in this situation is confronted with two attackers, one in front and one in back. Using the butt-end of his sword's hilt (tsuka kashira), the swordsman delivers a temporarily disabling strike to the solar plexus of the attacker in front. He quickly rotates 90 degrees to dispose of his rear attacker with a horizontal thrust of his sword (called tsuki), followed by a frontal pivot, to deliver the mortal overhead strike to his original stunned opponent in front.
Gohonme, Kesa Giri (cutting on a diagonal):
In the fifth kata, the swordsman is standing in a posture called tachi-iai. The swordsman is confronted with an emey whose sword is already drawn overhead and is about to deliver a forward downward cut. In that instant, the defending swordsman gains the initiative with a diagonal rising cut from his attacker's right armpit to left shoulder (the line of the kesa, or month's robe). The defender immediately reverses his blade to deliver a second, diagonally downward cut from his opponent's left shoulder to right hip.
Ropponme, Morote Zuki (two-handed thrust):
In the sixth kata, the swordsman is defending against two or three enemies, one or two of whom are located in front of the defending swordsman with the other behind him. The swordsman initially delivers a diagonal cut to the right head of the frontal enemy, immediately converting that action into a two-handed stabbing thrust to the mid-section of the foe. Rotating 180 degrees, the swordsman disposes of his rear attacker with an overhead cut. He quickly returns to this original frontal position to administer a fatal overhead cut to his original wounded foe or possibly a third attacker.
Nanhonme, Sanpo Giri (three-directional cutting):
In the seventh kata, the swordsman is confronted with three aggressors; one in front of him, one to his right, and one to his left. This sword technique requires three overhead downward cuts.
Happonme, Gammen Ate (face strike):
 In the eighth kata, the swordsman is confronted by two attackers, one
in front, and one from behind. Sensing hostile intentions, the swordsman reacts
by striking his front enemy's face with the butt end of his sword hilt, before
the enemy can draw his blade.
In the eighth kata, the swordsman is confronted by two attackers, one
in front, and one from behind. Sensing hostile intentions, the swordsman reacts
by striking his front enemy's face with the butt end of his sword hilt, before
the enemy can draw his blade.
Pivoting 180 degrees, the swordsman administers a
thrust to the solar plexus of his rear opponent. Returning to the original
frontal position, a moral overhead strike is delivered to the initially stunned
foe.
Kyuhonme, Soete Tsuki (joined-hands thrust):
In the ninth kata, the swordsman is walking when confronted by a single sword-bearing aggressor on his left side. Sensing hostile intentions, the swordsman immediately faces his attacker with an initial cut to his right shoulder and chest, followed with a fatal short thrust into the attacker's abdominal region.
Juhonme, Shiho Giri (four-directions cutting):
In the tenth kata, the swordsman finds himself surrounded by four sword-bearing enemies. This situation incorporates sword handling techniques and attitudes of previously demonstrated techniques to methodically dispose of each attacker in an efficient manner.
Ju-ipponme, Sou Giri (all cuts):
In the eleventh kata, the swordsman is walking forward and senses the harmful intent of an opponent, seizes the opportunity and draws the sword in a block. Advancing with each cut, the swordsman then cuts the opponent's left temple to right chin, right shoulder to solar plexus, left underarm to center of the abdomen, horizontally from the opponent's right thigh to his left, then finishes with a large overhead cut from forehead to abdomen.
Ju-nihonme, Nuki Uchi (draw cut):
In the twelvth and final kata, the opponent and swordsman are facing each other. As the opponent suddenly draws his sword, the defender draws his sword overhead and steps back, immediately executing a mortal blow.
Suggestions for Testing:
 When it comes time to test for rank in ZNKR iaido, please
review the information available from the All United
States Kendo Federation website, which offers a
study guide for iaido
testing and tips for judges.
When it comes time to test for rank in ZNKR iaido, please
review the information available from the All United
States Kendo Federation website, which offers a
study guide for iaido
testing and tips for judges.
The following supplemental information has been gathered from past seminars, including the AUSKF Rules for the 1998 AUSKF Summer Iaido Camp. This information is subject to change pursuant to AUSKF and regional federation requirements. Be sure to consult your instructor.
Time in Grade:
In general, students wishing to test must be members of both the AUSKF and a regional federation. As indicated in the following chart, there is a minimum practice period for each grade, as well as a minimum age.
|
Grade |
Minimum Practice Period |
Minimum Age |
| kyu | none | none |
| shodan | 3 months after ikkyu | 14 years |
| nidan | 1 year after 1 dan | |
| sandan | 2 years after 2 dan | |
| yondan | 3 years after 3 dan | |
| godan | 4 years after 4 dan | |
| rokudan | 5 years after 5 dan | |
| shichidan | 6 years after 6 dan | |
| hachidan | 7 years after 7 dan | 46 years |
| kyudan | after grading of 8 dan | 65 years |
| jyudan | after grading of 9 dan |
Examination Subjects:
| 6-2 kyu | 3 kata from ZNKR & written exam |
| ikkyu | 3 kata from ZNKR & written exam |
| shodan | 5 kata from ZNKR & written exam |
| nidan | 5 kata from ZNKR & written exam |
| sandan | 5 kata from ZNKR & written exam |
| yondan | 5 kata mixed ZNKR & koryu plus written exam |
| godan | 5 kata mixed ZNKR & koryu plus written exam |
| rokudan | 5 kata mixed ZNKR & koryu plus written exam |
| shichidan | 5 kata mixed ZNKR & koryu plus written exam |
| hachidan | 7 ZNKR, 7 koryu & written thesis |
The examination subjects for kyudan and jyudan are determined by special
committee.
Some exam questions tend to be qualitative in nature. For example, "What have
you gained in practicing iaido?" Other questions are substantive in nature.
For example, "What are the four major components of each kata?"
There is a fee for testing, over and above dues paid for membership in AUSKF and
a regional federation.
Successful test applicants must also pay a menjo or certificate fee for
successfully passing their test.
 Joe's
Tips for Mae:
Joe's
Tips for Mae:
1. Release your upper body tension. Poor balance may be caused by too much upper body tension (tense shoulders and arms result in your balance being too high; tension should be in your lower abdomen and buttocks).
2. Check your foot position prior to standing. If the feet are too far apart (front to back), it is very difficult to stand up. If the feet are too close together (front to back) the tendency is to stand with more weight on one foot (center of balance is not centered between feet, i.e. balance is off, so posture is off). If the feet are too close together side to side, it is like standing on a tight rope so you don't have a stable foundation to stand on. As a result, your balance suffers, so posture is off.
3. Check your balance prior to standing. Your ears should be centered over your shoulders, which should be centered over your hips, which should be centered over your left knee. The left foot should be directly behind the left knee (i.e. not angled in where it was when you were in seiza). The front of the right leg should be vertical. If all of these conditions are met, your weight is pretty much centered between the contact areas of your feet. When you stand, the contact area of your back foot changes (it was just your toes and the front of the ball of your foot, but as you stand it shifts back some as the area of your back foot in contact with the floor increases); as a result, your weight (therefore your hips, shoulders, etc) shift back slightly.
4. Don't skip stretching and warmups. This part of class may be boring, especially for young folks, but flexibility (toes, ankles, achilles, calf, groin, hamstring, etc.) and strength (quads, glutes, calves, lower abdomen) is required for much of this to work correctly.
5. Befriend your butt. Something that will help prevent stepping out too far during nukitsuke: squeeze your butt cheeks together. In fact, squeeze them together from the time you are in seiza about to begin the kata until your are done with the kata. This will also help keep your back straight and your shoulders relaxed.
Tips from Kim Taylor:
The following ideas were borrowed from Kim Taylor's 1992 Toronto seminar notes. Mr. Taylor's notes assume that the testing area will be marked with a starting and finishing point with a piece of tape on the floor. There may also be a rectangular area marked with tape that you may not be allowed to move out of during the test.
SAGEO CONTROL: The handling of the sageo should be consistent at the beginning and end. For example, don't fold it twice when you start and four times when you finish the test. On the bows, the sageo must be between the sword and yourself.
KNEELING: When going into seiza, the feet do not move. The left knee is placed on the floor without pulling the left foot back, and then the right knee is placed down to the correct position. The knees should be placed down just behind the tape mark.
TATE HIZA: Moving into the kneeling position for Tsuka Ate is similar to moving into seiza. The left knee is placed down without moving the left foot. The right foot is then brought forward to the left knee.
OPENING TO REI (sword bow): The sword should be place din front of the knees with the edge facing away from yourself, the tip to the left and the tsuka (handle) slightly forward. When you bow, the elbows should not touch the floor, and the inside edge of the elbow should be touching the outside edge of the knee. Don't let the arms bend out.
SWORD INTO BELT (taito): Pick up the sword with both hands and take it directly to the belt without changing the angle.
METSUKE (gaze): You should be looking at your opponent, not at the judges, your fellow students, or the birds outside the windows.
KIRI TSUKE: Cutting down when kneeling means that the blade finishes just below horizontal. When you are standing up, the blade finishes horizontal; the tip should be about the same height as the handle. The exception is Uke Nagashi, where the tip finishes slightly down.
FOOTWORK: When standing, the rear heel should be down about half an inch from the floor.
CHIBURI, GENERALLY: The left hand moves back to the left hip and saya. The left thumb rests on or behind the saya, and the fingers are straight, together, and pointing down the leg.
CHIBURI, KESA GIRI: The tsuba should be beside the mouth and one fist away. The blade angle is no more than 45 degrees back from vertical, and the edge should face the opponent. The armpits should be closed and relaxed, don't stick the elbows out.
NOTO: Do not guide the blade into the saya with your left fingers.
FINDING THE TAPE: When you finish a kata, you should return to the starting point. Lightly brush the floor with your toes on the way back to find the tape.
LAST BOW: When taking the sword out of the belt or picking it up again after the bow, the sword is placed down on the floor so that it is vertical.
Copyright 2009 by River City Iaido & Kendo Kyokai, All rights reserved. Report web problems to the webmaster